Teach Claude to Watch YouTube videos and Take Notes in Notion


In our previous blog, we explored the Model Context Protocol (MCP) — a powerful new standard that connects AI assistants to real-world tools, data, and services in a consistent, scalable way. We talked about how it can transform a model like Claude from a conversational genius into a true digital assistant that acts on your behalf. How can we put this powerful concept into practice?
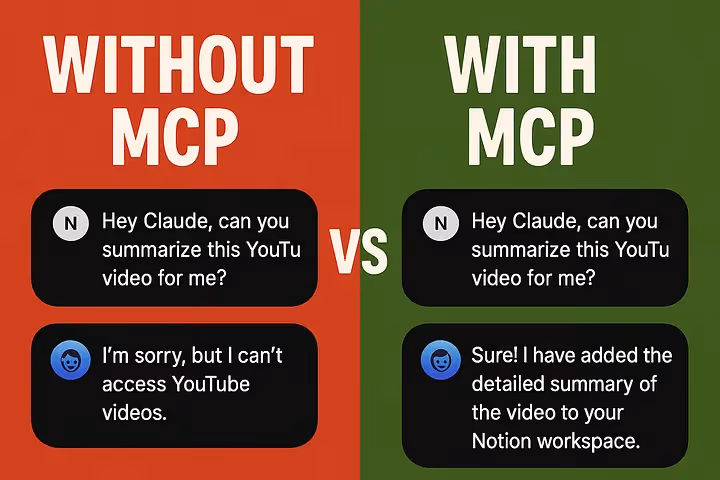
Most of us consume information faster than we can organize it. Especially on YouTube. You watch a 40-minute video full of insights — only to immediately forget 90% of it. Or you want to share that video with your team, but you know they won’t watch it unless there’s a summary.
The problem: there’s no easy way to turn long-form video content into actionable notes you’ll actually refer back to. Not manually. Not consistently. And certainly not without switching tabs five times.
Today, we’re going to solve that — by building a real-world integration using Claude, MCP, and Notion. You’ll create a custom MCP server that allows Claude Desktop to:
- Accept a YouTube URL,
- Summarize its contents,
- And automatically create a new Notion page with that summary for future reference.
This is a simple, clean workflow — but it packs a punch. You’re connecting three powerful tools (Claude, YouTube, Notion) with minimal glue code, using a protocol designed for scale and reuse. Whether you’re a student, researcher, content creator, or just someone who watches a lot of videos and wants to retain what matters — this one’s for you.
Let’s get building.
How It Works: A Quick Architecture Overview
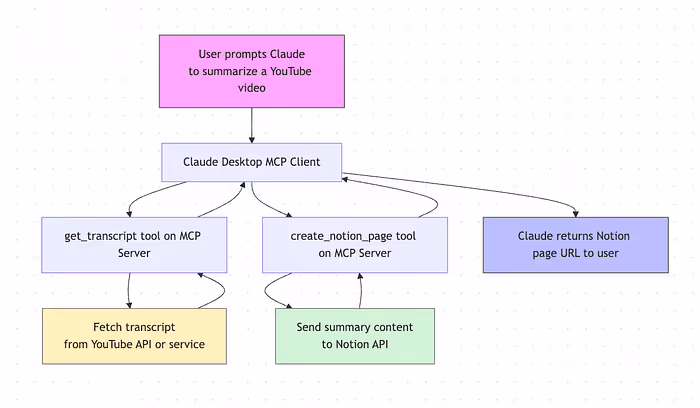
Before we jump into code, here’s the flow of what you’re about to build.
- User asks Claude Desktop to summarize a specific YouTube video.
- Claude calls your MCP server, using a tool like
get_transcript. - The server fetches and returns the transcript from YouTube
- Claude then calls a tool
create_notion_pagewith the Notion page content containing the summary of the video using Notion’s API to publish the summary in your workspace. - Once the page is created, Claude returns the URL of the new Notion page created.
Quite simple yet powerful, isn’t it!
Create a Notion Integration
In order for the Notion API to be able to access our workspace, we need to create a Notion Integration.
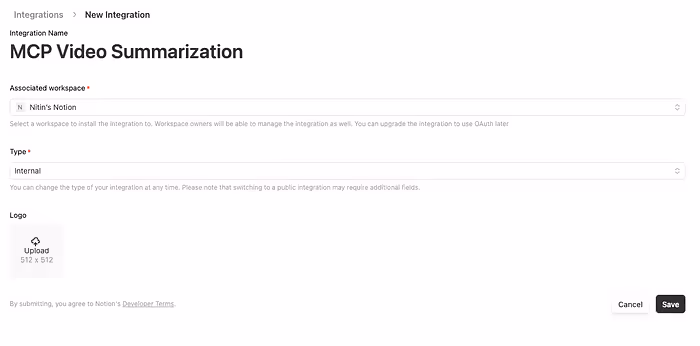
You can visit https://www.notion.so/profile/integrations and click on “New integration”. Here, you can give a name to your integration, select the associated workspace and click on Save.
Next, click on “Configure integration settings” and copy and save Internal Integration Secret. This will give us access to the workspace.
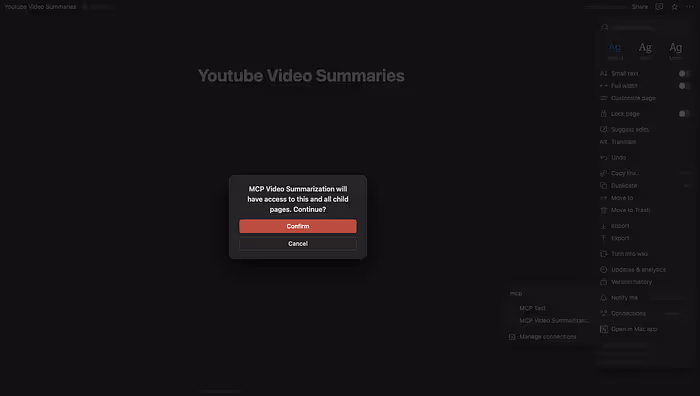
We will now create a new Notion page in the workspace which will have all the video summaries. After creating the page, click on the ‘…’ button in the top right, scroll down to Connections and type in the integration name that we just created. Click on confirm to give the integration access to this page.

Finally, copy and save the page id which is alphanumeric code at the end of the page URL.
Create the MCP Server
Create and Setup the project
# Create a new directory for our project
uv init yt-summarizer
cd yt-summarizer

# Create virtual environment and activate it
uv venv
source .venv/bin/activate

# Install dependencies
uv add "mcp[cli]" httpx youtube-transcript-api python-dotenv

# Create the server file
touch server.py

# Create the .env file
touch .env
Setup the .env file
Add your Notion Internal Integration Secret and the Page ID in the .env file.
NOTION_TOKEN=YOUR_NOTION_TOKEN
PARENT_PAGE_ID=YOUR_PARENT_PAGE_ID
Create the MCP server and tools
Now, we will write the code to create the MCP server and expose the required tools to the client.
from mcp.server.fastmcp import FastMCP
from youtube_transcript_api import YouTubeTranscriptApi
import requests
from typing import Dict, Any
import os
from dotenv import load_dotenv

load_dotenv()

NOTION_TOKEN = os.getenv("NOTION_TOKEN")
PARENT_PAGE_ID = os.getenv("PARENT_PAGE_ID")

mcp = FastMCP("Youtube Summarizer")

ytt_api = YouTubeTranscriptApi()

# Set up the headers for the request
headers = {
    "Authorization": f"Bearer {NOTION_TOKEN}",
    "Content-Type": "application/json",
    "Notion-Version": "2022-06-28"
}

@mcp.tool()
def get_transcript(video_id: str) -> str:
    """
    Fetches the transcript of a YouTube video.
    Args:
        video_id: The ID of the YouTube video.
    Returns:
        The transcript of the YouTube video.
    """
    fetched_transcript = ytt_api.fetch(video_id)
    transcript_text = ""
    for snippet in fetched_transcript:
        transcript_text += snippet.text + " "
    return transcript_text

@mcp.tool()
def create_notion_page(notion_page_content: Dict[str, Any]):
    """
    Creates a new page in Notion with a fully structured page with
    all the information from the video transcript.
    Make sure to include "parent": {"page_id": PARENT_PAGE_ID},
    in the dictionary.
    Args:
        notion_page_content: A dictionary containing the content
        of the new page.
        Sample Structure:
        {
            "parent": {"page_id": PARENT_PAGE_ID},
            "properties": {
                "title": {
                    "title": [
                        {
                            "text": {
                                "content": "New Page Title"
                            }
                        }
                    ]
                }
            },
            "children": [
                {
                    "object": "block",
                    "type": "paragraph",
                    "paragraph": {
                        "rich_text": [
                            {
                                "type": "text",
                                "text": {
                                    "content": "This is a
                                    paragraph in the new page."
                                }
                            }
                        ]
                    }
                },
                {
                    "object": "block",
                    "type": "to_do",
                    "to_do": {
                        "rich_text": [
                            {
                                "type": "text",
                                "text": {
                                    "content": "This is a
                                    to-do item."
                                }
                            }
                        ],
                        "checked": False
                    }
                }
            ]
        }
    Returns:
        The response from the Notion API.
    """
    notion_page_content["parent"]["page_id"] = PARENT_PAGE_ID
    response = requests.post(
    f"<https://api.notion.com/v1/pages>",
    headers=headers, json=notion_page_content)
    return response.text

if __name__ == "__main__":
    mcp.run()
Connect Claude Desktop App to our MCP server
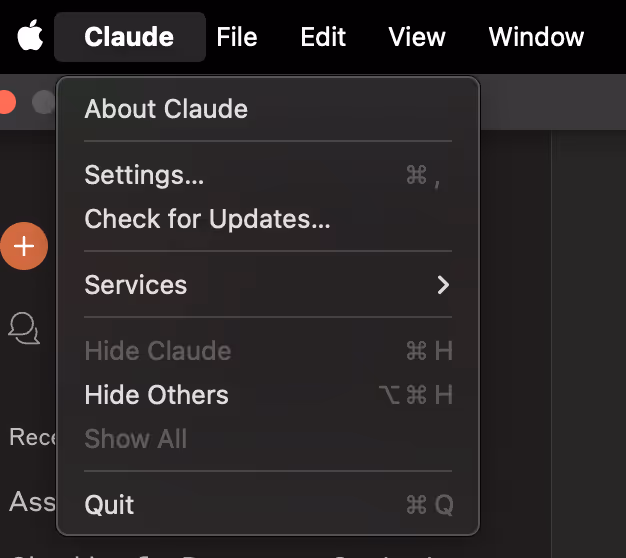
To begin, open the Claude menu from your computer’s menu bar and select “Settings…”. Note that this is different from the Claude Account Settings within the app window.
Click on “Developer” in the left-hand bar of the Settings pane, then click “Edit Config”.
This will create a configuration file at:
- macOS:
~/Library/Application Support/Claude/claude_desktop_config.json - Windows:
%APPDATA%\\Claude\\claude_desktop_config.json
If you don’t already have one, the file will be created and displayed in your file system.
Open the configuration file in your preferred text editor and replace its contents with this:
{
  "mcpServers": {
    "Youtube Summarizer": {
          "command": "uv",
          "args": [
              "--directory",
              "COMPLETE/PATH/TO/yt-summarizer",
              "run",
              "server.py"
          ]
      }
  }
}
Make sure you add the complete path to the yt-summarizer directory.
After updating your configuration file, you need to restart Claude for Desktop.
Upon restarting, you should see a hammer icon in the bottom left corner of the input box:

Congratulations! You have successfully setup your first MCP server! Now let’s test it out.
Testing out the MCP Capabilities
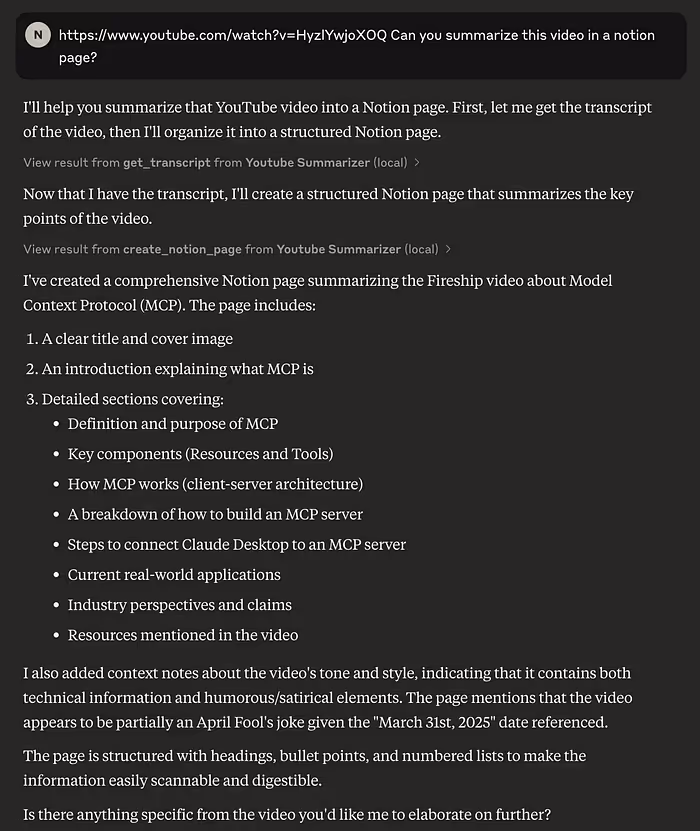
Let’s checkout the page that it created:

We now have a comprehensive summary of the video!
Conclusion
Claude can now successfully “watch” the videos on our behalf and make comprehensive summaries of them in your Notion workspace using MCP! This solution not only saves time but also ensures you never lose valuable insights from the videos you watch.
The beauty of this implementation lies in its simplicity and extensibility. With just a few components — an MCP server, some Python code, and Claude Desktop — we’ve created a workflow that can transform how you consume and retain video content.
But this is just the beginning. You could extend this foundation to:
- Add timestamps to key points in the summary
- Categorize videos automatically based on content
- Generate action items or to-do lists from educational content
The Model Context Protocol opens up endless possibilities for connecting AI models with real-world tools. What will you build next?
In our next blog post, we’ll explore how MCP can serve as a powerful tool for enforcing AI model safety!
References
https://github.com/modelcontextprotocol/python-sdk
https://modelcontextprotocol.io/quickstart/server
https://modelcontextprotocol.io/quickstart/user
.avif)


.png)